
Over 70% of new badminton players quit within a year partly because their equipment works against them, not with them. If you’re moving beyond casual hits and want real progress, your gear choices now will shape your technique, comfort, and even injury risk. From racket balance and grip size to shoes, shuttles, and string tension, each choice either supports your development—or quietly holds it back. Let’s make sure yours do the former.
Key Takeaways
- Choose a mid-range graphite racket in 4U weight with even balance and medium-flex shaft for a forgiving, all-round setup.
- Use medium-gauge strings (0.68–0.70 mm) at 20–23 lbs for beginners and 23–26 lbs for intermediates, restringing every 2–4 months.
- Select a grip size that fills your hand with a slight gap; fine-tune feel using overgrips for thickness, tackiness, and sweat control.
- Invest in badminton-specific shoes with non-marking, grippy soles, strong lateral support, and snug fit, paired with moisture-wicking, padded socks.
- Start with durable plastic shuttles for practice, gradually introducing feather shuttles as control, timing, and consistency improve.
Understanding Your Skill Level and Playing Style
How honestly can you assess your own game before you start buying gear? Begin by defining your current level. As a beginner, you’re still developing basic grips, footwork patterns, and consistent contact. As an intermediate, you execute clear, drop, and smash with intention, recover to base quickly, and read opponents’ shots.
Next, identify your playing style in real rallies, not just drills. Do you win more points through rallies or quick attacks? Do you naturally stay in rear court, command the net, or rotate confidently in doubles?
Evaluate your physical traits: swing speed, endurance, and wrist strength. Finally, note technical weaknesses—late contact, poor overhead preparation, unstable lunges. These factors should guide every equipment choice you make. Consider racket weight and balance when matching gear to your playstyle, since head heavy rackets generate more power while head light rackets increase maneuverability.
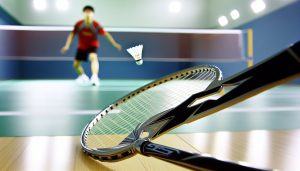
Choosing the Right Badminton Racket
Many players treat rackets like fashion, but yours should be a tool matched precisely to your game. Start with weight: lighter rackets (5U/4U) help fast reactions and defense; slightly heavier (3U) add stability and power if you’ve got decent strength and timing. Next, consider balance: head-heavy for powerful clears and smashes, even-balance for all-round play, head-light for rapid drives and interceptions.
Use these guidelines:
- Defensive / doubles-focused: 4U, head-light or even-balance for quick exchanges.
- Attacking / rear-court: 3U–4U, head-heavy for steeper, heavier smashes.
- Developing all-rounder: 4U, even-balance to build complete skills.
Finally, choose a medium-flex shaft as a beginner–intermediate; only move to stiff when your technique and swing speed are reliably strong. Manufacturers like Yonex are known for innovation and quality in racket design, so consider model lines from Yonex when comparing options.
Grip Size, Overgrips, and Handling Comfort
Once you’ve matched a racket to your style, you need a grip setup that lets you actually use that racket’s qualities under pressure. Your ideal grip size lets you wrap your fingers comfortably, leaving a small gap (about a pencil’s thickness) between fingertips and palm. If it’s too thick, you’ll lose finger control; too thin, you’ll over-squeeze and tense up.


Use overgrips to fine‑tune thickness, tackiness, and sweat absorption without permanently changing the handle.
| Focus | Coaching Cue |
|---|---|
| Power & clears | Slightly thicker grip for stability on big swings |
| Control & net | Slightly thinner grip for faster finger adjustments |
| Defense & drives | Prioritize tacky, absorbent overgrip for quick shifts |
Replace overgrips regularly; a worn, slippery grip quietly reduces precision and reaction speed. Mastering basic grips like the forehand and backhand helps you apply these grip choices effectively in play, so practice quick grip changes and adjustments to stay ready for dynamic rallies with grip versatility.
Shuttlecocks: Plastic Vs Feather and How to Choose
Next, you need to choose between plastic and feather shuttlecocks, as each type behaves differently regarding flight stability, shuttle speed, and responsiveness to your shots. You’ll also want to balance durability and cost, since plastics last longer but feathers offer superior performance and feedback. By matching the shuttle type to your skill level and training goals, you can make practice more efficient and match play more realistic.
Key Differences in Flight
Two shuttlecock types dominate badminton—plastic (nylon) and feather—and they don’t just feel different, they fly differently in ways that directly affect your timing, technique, and shot selection. Plastic shuttles accelerate more slowly, then keep carrying, so clears travel deeper and lifts can easily go long. Feather shuttles “bite” the air, decelerate faster, and drop more steeply, rewarding precision and early preparation.
Key flight differences you must adapt to:
- Trajectory – Plastics follow a flatter, more parabolic arc; feathers trace a sharper, “nose‑down” drop, especially in fast drops and smashes.
- Speed profile – Plastics maintain speed; feathers slow quickly after the initial burst.
- Control window – Feathers give a narrower, more predictable landing zone, ideal for tight net shots and clipped pushes.
Durability and Cost Factors
Durability and cost become decisive when you’re choosing between plastic and feather shuttles, because they dictate not just what you spend, but how consistently you can train. Plastic shuttles are far more durable: they withstand mishits, scuffed frames, and off‑center contact with minimal deformation. That lets you run longer drills without constantly changing shuttles, reducing interruptions and overall cost per hour.
Feather shuttles, while fragile, offer better performance but break down quickly: cracked feathers, warped skirts, and speed loss after a few hard smashes. You’ll replace them frequently, so the initial tube price understates the real cost. When budgeting, calculate cost per training session, not per tube, and factor in how many shuttles you typically break in one focused hour of play.
Choosing for Your Skill Level
Even though both plastic and feather shuttles can be used at any level, your current skills and goals should drive the choice. If you’re a beginner learning basic strokes, plastic is more forgiving: it flies slower, lasts longer, and lets you repeat rallies without worrying about damage. However, it doesn’t mirror the flight or touch required in serious play.
As you move toward intermediate level, you should gradually incorporate feather shuttles. They reward clean technique, expose mishits, and better reflect match conditions. A smart adjustment plan:
- Use plastic for multi‑shuttle drills and basic consistency work.
- Use lower‑grade feather for tactical drills and game simulations.
- Reserve high‑grade feather for matches or intensity sessions focused on precision and timing.
Badminton Shoes, Socks, and On-Court Footwork Support
Your footwork is only as sharp as the shoes, socks, and insoles that support it, so you’ll want gear optimized for grip, stability, and shock absorption on an indoor court. You should select badminton-specific shoes with the right sole compound, heel support, and lateral rigidity, then pair them with technical socks that manage friction, moisture, and blister risk. From there, you can fine-tune comfort and joint protection with appropriate insoles or orthotic support tailored to your foot shape and movement style.
Choosing Proper Badminton Shoes
How much does your movement really depend on what’s on your feet? In badminton, almost everything. Proper shoes let you plant, push, and recover without hesitation. You want low-to-the-ground, non-marking court shoes with strong lateral support and a flexible forefoot for lunges and split-steps.
Focus on three performance factors:
- Grip and sole – Choose gum-rubber or high-traction indoor soles. Check for a rounded, slightly raised edge so you can pivot cleanly without your foot “catching.”
- Stability and structure – Prioritize firm heel counters, sidewall reinforcement, and a snug midfoot wrap to control aggressive directional changes.
- Fit and court feel – Aim for a locked-in heel, minimal internal movement, and just enough toe room to prevent jamming on hard lunges.
Socks, Insoles, and Support
While shoes do the heavy lifting, socks and insoles fine‑tune how securely and efficiently you move on court. Prioritize technical fit: snug but not constricting, with no sliding inside the shoe. Double-layer or padded badminton socks reduce friction at the heel and forefoot, cutting blister risk during explosive lunges.
| Item Type | Key Feature | Coaching Note |
|---|---|---|
| Socks | Padded heel & forefoot | Protects during repeated jumps and hard lunges |
| Socks | Moisture‑wicking, seamless toe | Prevents hotspots over long training blocks |
| Insoles | Firm arch, structured heel cup | Stabilizes landings, improves change‑of‑direction |
| Support | Ankle/arch sleeves (if needed) | Use only for history of issues; don’t mask pain |
Choose insoles that slightly reduce in‑shoe volume, locking the midfoot without lifting your heel.
Strings, Tension, and Basic Maintenance
Strings are the engine of your racket’s performance, directly controlling shuttle speed, feel, and control. For beginners and intermediates, a durable, medium-gauge string (0.68–0.70 mm) is usually best, giving you a good balance of power, control, and lifespan.
Tension shapes how the racket plays:
- 20–23 lbs: More trampoline effect, bigger sweet spot, easier power; ideal if you’re still refining technique.
- 24–26 lbs: Sharper control and feedback, but less margin for error; suits improving intermediates.
- Above 26 lbs: Only when your timing, strength, and technique are very solid.
For maintenance, restring when tension feels noticeably loose, strings look frayed, or performance drops—typically every 2–4 months if you play weekly. Store your racket away from heat and direct sunlight. Higher string tension can increase power but also raises the risk of string breakage, so choose tension with care.
Budgeting, Brand Choices, and Suggested Starter Setups
Even with limitless options on the market, you can build an effective badminton setup by allocating your budget deliberately across racket, strings, shoes, and shuttlecocks rather than chasing big brand names alone. Prioritize performance-per-dollar: shoes and strings influence your game more than cosmetic racket upgrades.
For beginners, target a mid‑range graphite racket, factory grip plus an overgrip, and durable nylon shuttles. Invest in stable, non‑marking court shoes with solid lateral support; they prevent injury and improve movement efficiency.
Brand-wise, don’t lock into one label. Mix: a value racket brand, a string specialist, and a footwear brand known for indoor court shoes. For intermediates, upgrade strings and tension first, then consider a second racket with a slightly different balance to cover both singles and doubles. A well-chosen racket series like the Nanoflare Series can help improve swing speed and maneuverability.

