It’s no coincidence that when your clears go off target, your contact point is usually off too. You’re probably swinging hard, but if you’re not striking the shuttle slightly in front of your hitting shoulder with the right arm position and racket angle, accuracy drops fast. Once you understand how height, timing, body alignment, and grip all shape the shuttle’s flight, you’ll start to see why most players miss a simple but essential adjustment…
Key Takeaways
- Meet the shuttle slightly in front and above your hitting shoulder, with your arm extended but relaxed for clean, repeatable contact.
- Turn your body sideways with weight on the rear foot, keeping a tall trunk and high racket elbow to stabilize the contact point.
- Time your split-step and last stride so you arrive before the shuttle peaks, avoiding low, late, or rushed contact.
- Use a relaxed forehand “handshake” grip and a slightly open racket face to control shuttle angle and length.
- Practice shadow swings, multi-shuttle contact ladders, and wall clears to groove consistent contact height, distance, and pronation timing.
Why Your Badminton Clears Miss the Mark
Although clears seem simple, they often miss the mark because several technical elements break down at once: footwork, preparation, contact point, and swing mechanics. You’re usually late to the shuttle because your recovery and split-step timing are off, so you reach rather than rotate your body behind the shot. That destroys stability and consistent shuttle trajectory.
Your preparation also drifts: the racket arm drops, shoulder alignment opens too early, and your non-racket arm doesn’t balance your trunk. As a result, your swing path becomes inconsistent and compensatory. Improving your timing so you consistently strike within the racket’s sweet spot will greatly stabilize both power and directional control of your clears.
Finally, your swing mechanics often rely on arm strength instead of a coordinated kinetic chain—legs, hips, trunk, shoulder, forearm. This reduces control of shuttle direction, height, and depth, so clears land short or float long.
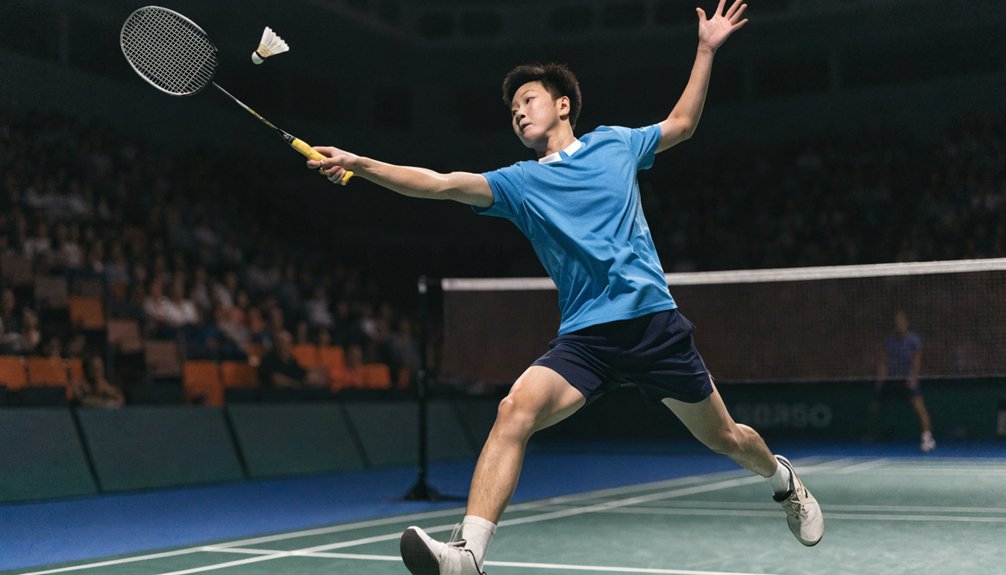
What a Good Clear Contact Point Looks Like
Once you understand why your clears break down, the next step is fixing where you meet the shuttle. A good clear contact point is slightly in front of your hitting shoulder, not directly above or behind your head. This alignment lets your kinetic chain transfer force efficiently from legs, trunk, and shoulder into the shuttle. Your hitting arm should be extended but not locked, with the elbow comfortably open so the forearm can pronate through impact. The racket face must be very slightly open, not flat or closed, to create length without floating the shuttle. You should feel contact on the racket’s sweet spot, with a crisp, short contact time. Visually, the shuttle should be struck cleanly, without slicing or noticeable wobble. To make this contact point easier to repeat, ensure your grip size and type are comfortable, as a well-fitted racket grip improves control and helps you consistently align the shuttle on the sweet spot.
Find the Ideal Contact Point Height for Clears
Think of “ideal height” as a functional range, not a single point:
- Above your head line: Contact should be slightly in front and clearly higher than the top of your skull.
- Within your natural reach: Arm extended but not locked, so you can accelerate the racket head.
- Consistent apex zone: Aim to contact shuttles in a narrow vertical band for repeatable length.
Maintaining this contact range is much easier if your forehand grip mimics a relaxed handshake, letting you extend naturally without tightening your arm or wrist.
Position Your Body for a Strong Clear Contact Point
When you’re positioning your body for a strong clear contact point, your goal is to align your whole kinetic chain so the shuttle meets a fast, stable racket head at the ideal height. Start by turning your shoulders and hips sideways, non‑racket shoulder pointing roughly toward the shuttle. This creates rotational potential and keeps the striking side free. Place your rear foot slightly behind and outside your front foot, forming a stable, staggered base. Keep knees flexed, weight mostly on the rear foot, and your center of mass under control, not leaning backward. Raise your racket elbow high and relaxed, slightly behind your body line, so the forearm and racket can accelerate forward efficiently. Keep your trunk tall, avoiding side‑bending that collapses the hitting shoulder. Using a lightweight racket with enhanced maneuverability makes it easier to get the racket head into the ideal contact position quickly, improving both timing and accuracy on your clears.


Time Your Swing for Peak Clear Contact
To time your swing for peak clear contact, you’ll need to identify the shuttle’s ideal height—just before it starts to drop from the apex of its trajectory. Your racket acceleration must match the shuttle’s arc so that maximum racket head speed occurs precisely at this contact point. To support this, you’ll adjust your footwork pattern and split-step timing so you arrive under the shuttle early enough to execute a full, uninterrupted swing. Knowing the full court diagonal and overall court dimensions helps you judge shuttle travel distance and timing more precisely as you prepare for your clear.
Recognizing Optimal Shuttle Height
Key checkpoints:
- Track the shuttle’s peak, then identify the early descent phase you can actually reach without jumping.
- Compare the shuttle’s height with your fully extended racket arm; aim for 5–15 cm below absolute reach.
- Confirm your contact point allows a slightly downward racket path, not a flat or upward scooping motion.
Matching Swing To Arc
Having defined the ideal height for contact, you now need to sync your swing with the shuttle’s arc so impact occurs in that narrow “early descent” window. Conceptually, you’re matching three elements: the shuttle’s falling speed, your racket-head acceleration curve, and the final snap of forearm and fingers.
Visualize the shuttle’s peak, then count a consistent delay before initiating your swing, so the racket reaches maximum speed just before contacting. If you start too early, you’ll meet the shuttle still rising; too late, and it’s already dropped, flattening your trajectory.
In solo shadow swings, program a smooth, progressive acceleration: relaxed shoulder, then elbow, then forearm pronation and finger squeeze. Your goal is for the fastest portion of this chain to coincide exactly with contact.
Adjusting Footwork For Timing
Although swing mechanics determine how efficiently you hit, your feet dictate whether you can contact the shuttle at its ideal height and phase of descent. To time clears, you must arrive under the shuttle early enough to load, not chase. That means synchronizing your split-step, first step, and recovery with the opponent’s stroke tempo.
Use your footwork to regulate when your swing starts relative to the shuttle’s apex:
- Split-step as your opponent begins their stroke to pre-load both legs for any direction.
- Initiate crossover/ chasse so your last step lands just before the shuttle peaks, not as it’s already falling.
- Plant the racket-leg slightly behind the shuttle, letting your body momentum move forward through contact, stabilizing timing and maximizing shuttle height.
Common Contact Point Mistakes That Ruin Clears
When your clear keeps falling short or drifting off‑court, the problem usually starts at the contact point. If you strike the shuttle too low, you’re forced into a lifting motion instead of a clean, overhead transfer of momentum. Hitting behind your body closes your shoulder, reducing racket‑head speed and sending the shuttle wide or mid‑court.
You also ruin accuracy by contacting too close to your head, which shortens the swing arc, or by letting the shuttle drift past your ideal striking window. Mastering quick grip changes lets you adapt your racket angle so your contact point stays optimal even when the shuttle doesn’t come exactly where you expect it.
| Mistake | Technical Effect | How It Feels |
|---|---|---|
| Contact too low | Loss of angle, weaker trajectory | “Why’s it always short?” |
| Contact behind body | Rotational jam, shank risk | Stiff, cramped shoulders |
| Contact too close to head | Reduced leverage, mistimed snap | No “whip” in the stroke |
| Contact too far in front | Slice, unstable shuttle path | Clear feels unpredictable |
| Late shuttle recognition | Panicked swing adjustments | Constantly rushed, tense |
Drills to Groove a Better Clear Contact Point
To correct faulty contact mechanics, you’ll use three targeted drills that isolate and repeat the exact hitting position you want. Shadow swings for timing let you program the ideal contact height and racket path without the distraction of the shuttle, while a multi-shuttle contact ladder forces you to adjust contact point precisely under changing feeds. Finally, a wall clears technique drill gives you instant feedback on trajectory, racket angle, and timing so you can stabilize a consistent, high contact point. Building a repeatable contact point under pressure also strengthens your ability to block out mind games and psychological tactics from opponents, so your stroke mechanics don’t break down in tight, emotional moments.
Shadow Swings For Timing
Strip the shuttle away and you’re left with one of the most effective tools for improving clear timing: shadow swings. By removing contact, you isolate sequencing, rhythm, and spatial awareness of your ideal contact point—slightly in front of the racket shoulder, at full but relaxed reach. Focus on repeatable mechanics, not power.
1. Stationary shadow swings
Stand in your rear-court hitting stance. Trace the shuttle’s imagined trajectory, then swing with full overhead motion, freezing briefly at the contact point to check height, distance, and elbow extension.
2. Rhythm-based shadow swings
Use a metronome or count “split–load–hit” to lock timing between footwork, trunk rotation, and arm acceleration.
3. Footwork-integrated shadow swings
Add chasse or crossover steps, ensuring you’re balanced at the “hit” phase.
Multi-Shuttle Contact Ladder
Although shadow swings refine your sequencing, you still need live feedback from a real shuttle to lock in a reliable contact point, and that’s where the multi-shuttle contact ladder comes in. Stand in your rear court. Have a feeder toss or lightly lift a continuous stream of shuttles to your overhead zone.
Define three contact “rungs”: slightly behind your head, directly above your hitting shoulder, and slightly in front. For each rung, hit 10–15 clears, focusing only on matching the planned contact location, not power.
Track three variables: height of impact (fully extended elbow), shuttle position relative to your body line, and timing of pronation. If you’re reaching forward or collapsing your elbow, adjust your base position or preparation so each rung feels biomechanically efficient and repeatable.
Wall Clears Technique Drill
Once you’ve calibrated contact using a feeder, you can isolate your mechanics even further with a wall clears technique drill that removes shuttle flight from the equation. Stand 3–4 meters from a high wall line and hit shuttles directly into the wall, aiming to contact them at your ideal clear height in front of your hitting shoulder.
1. Setup and constraints
Mark an impact window on the wall (e.g., tape box). Only count hits that strike inside this zone.
2. Technical focus
Track elbow lead, delayed racket head, and full pronation while keeping a stable, vertical trunk.
3. Feedback and progression
Listen for a crisp, clean strike, minimal frame contact, and consistent rebound height. Progress by increasing tempo while maintaining identical contact geometry.
