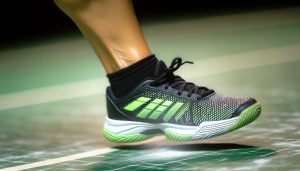
Most players don’t realize that the wrong indoor shoe can quietly cost them speed, balance, and even joint health over a season. When you’re moving explosively on a wooden or synthetic court, you need a non-marking outsole with the right rubber compound and grip pattern, cushioning that doesn’t introduce instability, and a chassis that controls torsion during lunges. If you want your footwork, not your footwear, to be the limit, the details matter next.
Key Takeaways
- Choose non-marking gum rubber soles with a tacky, multidirectional tread for strong grip on wooden or PVC indoor courts.
- Balance cushioning and court feel: low-to-medium stack height with responsive foam under heel and forefoot for shock absorption without instability.
- Ensure firm heel counter, torsion-control shank, and snug lacing to keep heel, arch, and midfoot stable during rapid direction changes.
- Check lateral support: wide base/outriggers and rigid sidewalls to prevent foot rollover during lunges and defensive slides.
- Get the right fit: thumb’s width in the toebox, no heel lift, comfortable forefoot containment, and arch alignment with the shoe’s midfoot.
Understanding Indoor Court Surfaces
Although they can look similar at a glance, indoor badminton courts vary considerably in material, friction, and shock absorption, and these differences directly affect how your shoes must perform. You’ll typically encounter three surfaces: wooden floors, synthetic PVC/vinyl mats, and less commonly, rubberized courts.
On wood, the surface is hard, fast, and moderately grippy. You need soles that grip without “sticking,” so you can decelerate quickly yet pivot cleanly. On PVC/vinyl mats, friction is higher and impact is better attenuated, so you must avoid overly soft soles that over-compress and slow take‑off.
Evaluate each venue: note how easily you slide, how much impact you feel in your knees, and how quickly sweat or dust reduces traction. Use this to define your required grip level and cushioning profile.
Key Differences Between Badminton and General Sports Shoes
When you switch from general trainers to badminton-specific shoes, the most critical performance changes come from the sole’s grip pattern and rubber compound, which control traction on smooth indoor courts. You also need shoes engineered for strong lateral stability to support rapid side-to-side lunges, split steps, and recovery movements without ankle roll. Finally, you should look for targeted cushioning and shock absorption tuned for repeated jumping, hard lunges, and quick decelerations rather than the straight-line impact typical of running shoes.
Sole Grip and Traction
Grip is the defining functional difference between true badminton shoes and general sports footwear. On indoor wooden or synthetic courts, you need high-friction, non-marking gum rubber soles that bite immediately on contact. Look for a tacky feel and a fine, multidirectional tread pattern that channels dust away from contact points instead of smoothing over.
Prioritize soles with segmented grip zones under the forefoot and heel; these improve traction during split-steps, lunges, and fast recoveries. Avoid running or generic trainers with harder EVA-blended outsoles—they’re built for straight-line motion and will slide on polished courts. Test by lightly twisting on a clean floor: your shoes should resist rotation without sticking so aggressively that they delay quick take-off or strain your knees.
Lateral Stability Needs
Unlike running or gym shoes that prioritize forward motion, badminton footwear has to manage violent side-to-side loads and abrupt directional reversals on a small base of support. You need a shoe with a broad, flared forefoot and midfoot to increase your lateral contact area and resist ankle rollover. Look for rigid or semi‑rigid lateral outriggers—extensions of the sole on the outer edge—that create a wider stability platform.


Check the upper: it should use reinforced side panels, tightly woven mesh, and synthetic overlays that lock your midfoot without painful pressure points. Ascertain the heel counter is firm and wraps the rearfoot securely; any heel slop multiplies instability. Finally, test torsional rigidity by twisting the shoe; it should flex at the forefoot, not twist through the midfoot.
Cushioning and Shock Absorption
Although most training and running shoes advertise “max cushioning,” badminton shoes have to balance impact protection with low stack height and court feel so you can accelerate, brake, and jump without delay. You’re not looking for a plush, slow-rebounding midsole; you need responsive foam or EVA that compresses quickly and recovers instantly.
Prioritize models with targeted cushioning in the rearfoot and forefoot rather than a uniformly thick platform. Heel cushioning should handle landings from smashes and jumps, while forefoot cushioning should protect repetitive lunges without feeling spongy. Check that the shoe bends at the ball of your foot, not mid-arch—excessive stiffness reduces shock absorption efficiency. Finally, avoid overly soft running-type midsoles; they increase instability and delay directional changes.
Choosing the Right Outsole Material and Grip Pattern
When you choose badminton shoes for indoor courts, you need a non-marking rubber compound that’s soft enough to generate high friction yet stable enough to resist smear and premature wear. You should assess how the rubber formula interacts with polished wooden or synthetic court finishes, especially under sweat and dust conditions. At the same time, you must match court-specific tread patterns—such as hexagonal or radial pivot zones—to your movement style to maximize grip during lunges, split steps, and rapid directional changes.
Non-Marking Rubber Compounds
Because badminton is played on delicate indoor surfaces that demand controlled traction, the non-marking rubber compound and grip pattern on your shoe’s outsole are critical performance components, not cosmetic details. You need a soft, high-friction rubber that’s explicitly labeled “non-marking,” meaning it won’t leave pigment or abrasion streaks on wood or PU courts.
Look for compounds with high natural rubber content; they deliver better tack and energy return than harder, outdoor-style synthetics. Press a fingernail into the outsole: it should deform slightly, then rebound quickly, indicating responsive cushioning and grip. Prioritize formulations engineered for low abrasion so they maintain traction without crumbling. If you play frequently, choose premium non-marking rubber; cheaper blends glaze over faster, reducing bite during explosive lunges and recovery steps.
Court-Specific Tread Patterns
Even with the right non-marking compound, your outsole’s tread geometry and rubber placement will ultimately dictate how efficiently you can plant, brake, and push off on an indoor court. For wood or PU floors, you’ll want a fine, closely spaced pattern that maximizes contact area while still channeling dust away. Look for rounded edges on lugs to reduce snagging during lunges and recovery steps.
Choose patterns based on your dominant movement demands:
| Priority | Tread Guidance |
|---|---|
| Explosive lunges | Deeper forefoot grooves for directional bite |
| Lateral defense | Chevron or herringbone along shoe perimeter |
| All-round play | Multi-directional micro-siping across outsole |
Inspect the midfoot: a slightly smoother zone allows controlled pivots without torsional “locking.”
Assessing Cushioning and Shock Absorption
Although traction often gets the spotlight, cushioning and shock absorption are what protect your joints and maintain performance over long matches on indoor courts. You want enough impact attenuation for jumps and hard lunges, but not so much that you lose court feel or responsiveness.
Prioritize midsole materials designed for badminton or volleyball: EVA or dual‑density EVA for lightweight compliance, and TPU or PU inserts for resilient energy return. Press the midsole with your thumb; it should compress slightly yet rebound quickly, not feel mushy.
Check forefoot cushioning specifically, since most badminton impacts occur on the balls of your feet during split steps and recovery. Look for a continuous cushioning platform, not isolated pods, to guarantee consistent shock distribution during rapid multi‑directional movements.
Evaluating Stability, Support, and Lateral Protection
When you evaluate stability for badminton, you’re checking how well the shoe’s ankle and arch support keep your foot aligned under rapid load changes. You’ll also need a rigid, well-contoured heel counter to minimize rearfoot wobble and improve energy transfer during push-offs and landings. Finally, assess lateral movement protection—sidewall structure, outriggers, and upper reinforcement—to control foot rollover during aggressive cuts and defensive lunges.
Ankle and Arch Support
Strong ankle and arch support is what keeps your foot locked in, aligned, and responsive during aggressive lateral movements, lunges, and jump landings on indoor courts. You’re aiming to minimize inversion/eversion at the ankle and prevent your arch from collapsing under load, which directly impacts reaction time, push-off power, and injury risk.
- Collar design: Choose a snug, padded collar that wraps the malleoli without restricting dorsiflexion, so you can cut sharply without roll-over.
- Midfoot shank: Look for a torsion-control shank that limits twisting while still allowing natural forefoot flex.
- Arch profile: Match shoe arch height to your foot; excessive or insufficient support both reduce stability.
- Lacing system: Use multi-eyelet or webbed lacing to cinch the midfoot uniformly and eliminate internal slippage.
Heel Counter Stability
Even if the midfoot and forefoot feel dialed in, a weak heel counter will let your rearfoot wobble and undermine the entire platform. You need a rigid, well-contoured heel cup that locks the calcaneus in place so your landing mechanics stay efficient and your energy transfer stays linear.
To evaluate heel counter stability, squeeze the heel area from both sides—it shouldn’t collapse easily. Then perform single-leg mini-hops and quick stops; your heel mustn’t shift or lift. Look for an internal counter combined with external reinforcement.
| Checkpoint | What You’re Looking For |
|---|---|
| Stiffness | Minimal deformation under firm squeeze |
| Heel height | Coverage up to just below the ankle bones |
| Padding | Secure lock without hot spots |
| Cup shape | Close match to your heel’s contour |
| Lockdown with lacing | No heel lift during aggressive deceleration |
Lateral Movement Protection
Although vertical cushioning gets most of the attention, your shoes’ ability to control sideways forces is what actually keeps your ankles and knees safe on tight defensive slides and cutbacks. You’re loading hard into valgus and varus angles, so you need the shoe to resist your joints collapsing inward or rolling outward under peak deceleration.
- Medial and lateral outriggers: Look for midsoles that flare beyond the upper on both sides; they increase the base of support during aggressive lunges.
- Rigid lateral wall: Squeeze the upper’s lateral side; it shouldn’t fold easily. Firm TPU films or cages prevent your foot from spilling over the edge.
- Midfoot shank: A torsion-resistant plate keeps the shoe from twisting on split-steps.
- Lockdown integration: Combine lateral eyelets, sturdy laces, and a snug midfoot wrap to stop in-shoe slippage.
Getting the Correct Fit, Width, and Sizing
Many players underestimate how much precise fit, width, and sizing affect on‑court stability, acceleration, and injury risk. Start by measuring both feet at the end of the day, in millimeters, wearing your match socks. Use length plus about a thumb’s width (6–8 mm) in the toebox to prevent toenail trauma during lunges and split steps.
Check heel lockdown: your heel shouldn’t lift when you perform quick shadow footwork. If it does, the internal heel counter or collar volume is mismatched. For width, your forefoot should feel firmly contained without hotspots along the 1st or 5th metatarsal heads.
Verify that your arch sits naturally over the shoe’s midfoot platform. If it spills inward or outward, you’ll lose precision in directional changes.
Weight, Flexibility, and Overall Feel on Court
While fit locks your foot to the platform, weight and flexibility dictate how efficiently you can convert strength into speed and control on court. You’re looking for the lightest shoe that still delivers stability for hard lunges, cuts, and jumps.
- Weight targeting – For fast, attacking play, aim for lighter models; if you’re powerful but injury‑prone, accept slightly heavier shoes with added stability.
- Forefoot flex – Bend the shoe at the ball of the foot; you want smooth flex there, but not in the midfoot, to keep energy transfer efficient.
- Torsional control – Twist the shoe; mild resistance protects your knees during aggressive direction changes.
- On‑court assessment – Test split‑steps, multi‑directional lunges, and recovery steps; reject any shoe that feels sluggish or unstable.
Breathability, Materials, and Build Quality
You’ve now tuned how the shoe moves with you; next, you need to control how it manages heat, stress, and repeated impact. Prioritize uppers with engineered mesh panels over solid synthetics in high-sweat zones (toes, medial forefoot, tongue). Check from inside: dense but open-weave mesh lets light through without feeling flimsy.
Look for laminated or fused overlays that reinforce the toe box and lateral sidewall without blocking all airflow. Multi-layer constructions should use thin, bonded layers rather than bulky stitching that adds hotspots and weight. Evaluate midfoot structure: an internal heel counter and medial supports should feel rigid when twisted but not bite into the arch. Flex the shoe and listen—excessive creasing, cracking, or wrinkling signals poor build consistency.
Durability, Maintenance, and When to Replace Your Shoes
Durability isn’t just about tough materials; it’s about how predictably a shoe holds its structure under badminton-specific loads—hard stops, repeated lunges, and rapid toe drags. You want uppers that resist stretching, midsoles that don’t bottom out, and outsoles that keep their grip pattern instead of rounding off.
- Daily care: After play, remove insoles, air-dry at room temperature, and brush off dust; never heat-dry, which hardens glue and midsole foam.
- Rotation strategy: If you play frequently, rotate two pairs to let cushioning recover and reduce sweat-driven breakdown.
- Wear indicators: Replace shoes when heel cushioning feels flat, forefoot bends off-axis, or outsole loses edge sharpness.
- Structural checks: Watch for upper tearing at eyelets or toe box and midsole creasing asymmetrically; both signal compromised support.
Budget, Brand Options, and Trying Shoes Before You Buy
Budget isn’t just a price cap; it’s a framework for matching performance features to how hard and how often you play. Allocate more if you train >3 times weekly or play tournaments—prioritize advanced cushioning, lateral stability, and durable outsoles. For casual play, mid‑tier models are usually sufficient.
| Focus Area | What You Should Do |
|---|---|
| Price Tier | Entry: basics only; Mid: balanced support; High: maximum stability, cushioning, and traction. |
| Brand Lines | Compare “stability,” “speed,” and “cushion” lines within each brand, not just brand name. |
| Fit & Last Shape | Note if brands run narrow/wide; match to your forefoot width and arch profile. |
| On‑Court Testing | Perform lunges, split‑steps, and lateral shuffles in the store if possible. |
| Final Check | verify zero heel slippage, secure midfoot lockdown, and no pinching during deep lunges. |