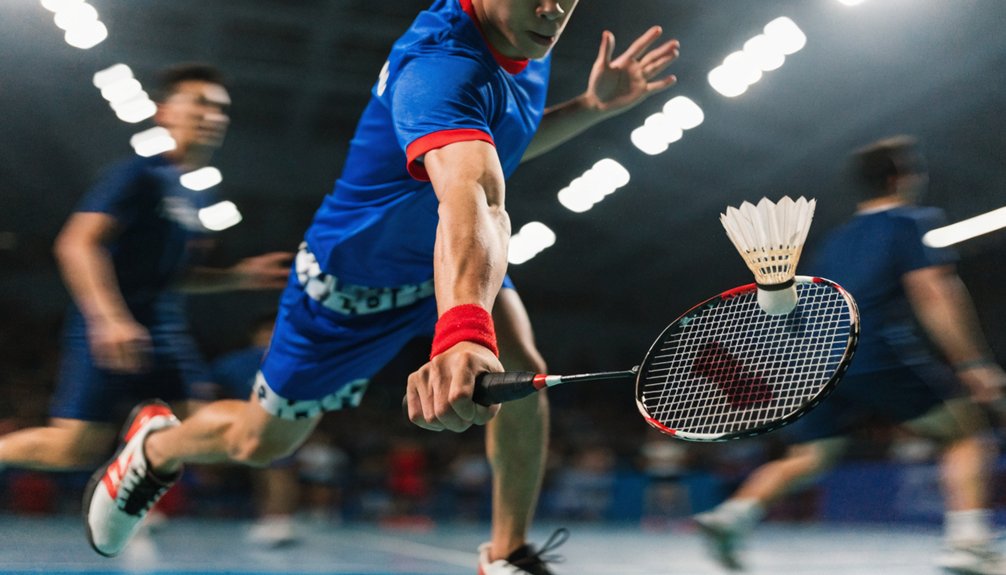
You’ve probably heard that smashing harder just means swinging harder, but that’s only partly true. Real power comes from how efficiently you load and transfer energy through your body, not how tense your arm is. If your feet arrive late, your grip is wrong, or your wrist locks up, you leak power no matter how strong you are. Fixing those details changes everything—once you see how, you’ll stop wasting effort on every smash.
Key Takeaways
- Use your whole body: drive from legs and hips, rotate trunk and shoulder, then transfer force through elbow, forearm, and wrist in sequence.
- Time your movement early so you’re balanced under the shuttle, striking it high with your hitting shoulder slightly behind the shuttle.
- Keep your grip, shoulder, elbow, and wrist relaxed, then tighten and accelerate sharply only at the last moment before contact.
- Lead with the elbow and let the racket head lag, using forearm pronation and a quick wrist snap right as you hit the shuttle.
- Practice shadow swings, wall hitting, and multi-shuttle drills focusing on correct contact point, body rotation, and precise targeting instead of brute force.
Where Smash Power Really Comes From
Although it looks like the racket arm does all the work, real smash power comes from the coordinated transfer of force from your legs, hips, and trunk through your shoulder, arm, and finally the racket head. You’re not “muscling” the shuttle; you’re sequencing joints so each contributes force into the next. Think of it as a kinetic chain. First, you preload by rotating your hips and trunk away from the shuttle, storing elastic energy in your core and shoulder. Then you initiate rotation from the hips, followed by the trunk, shoulder, elbow, and finally forearm and wrist. Each segment starts as the previous one slows, creating whip-like acceleration. When this sequence is clean, you’ll increase smash speed without swinging harder. Consistently striking the shuttle near the sweet spot of the racket face allows more of this transferred energy to turn into shuttle speed instead of vibration and shock.
Use Footwork to Arrive Balanced to Smash
Stable feet are the foundation of a heavy smash, because balance at impact lets you transfer force efficiently through the kinetic chain. To arrive balanced, you must time your split step as your opponent contacts the shuttle, then move with quick, small adjustment steps instead of long lunges. This keeps your center of mass under control. On a well‑maintained badminton court surface, with proper grip and cushioning, this balance is easier to achieve and helps you push off and stop safely. As you move back for the smash, turn your body side‑on and plant your non‑racket foot first, then “brake” with short, light steps so you’re no longer drifting when you hit. Land your final step slightly wider than shoulder width, knees softly flexed, weight centered—not falling backward or sideways. If you feel yourself still sliding on the floor, you’ve arrived late; refine your recovery and initial push.
Drive Smash Power From Legs and Core
Once you’re arriving balanced to the shuttle, the next gain in smash power comes from how effectively you load and unload your legs and core. Think of your legs as the engine and your core as the transmission. Before take‑off, split your stance slightly wider than shoulder‑width, rear foot turned sideways, knees flexed. Sink your hips straight down, keeping your chest stable, then push explosively through the rear leg as you jump. Your core’s job is to keep your trunk firm so energy from the legs travels efficiently into your upper body, not lost in collapsing posture. Combining this leg‑driven jump with a stable trunk also helps you transfer more power into the racket, especially if you’re using aerodynamic frame technology that rewards fast swing speeds.
| Focus | What you do precisely |
|---|---|
| Stance width | Feet just wider than shoulders |
| Rear foot angle | Turned ~45° outward for stronger push |
| Knee flexion | Bend to a comfortable, springy quarter‑squat |
| Hip drop | Lower hips vertically, don’t lean sideways |
| Core engagement | Brace lightly, ribs down, avoid arching your back |
Use Body Rotation and Wrist Snap for Power
To turn your smash into a true power shot, you’ll need to engage your core and hips so your whole body contributes to the swing. As you rotate, coordinate your shoulder rotation with this hip drive to create a smooth, accelerating chain of motion. Finally, maximize your wrist snap at the instant of impact, converting that stored rotational energy into a fast, steep shuttle trajectory. Just as top shuttlers use psychological tactics to gain an edge in tight rallies, you can combine this efficient body rotation and wrist snap with strong mental focus to keep executing a powerful smash under pressure.
Engage Core And Hips
Although arm strength seems important, your smash’s real power comes from how effectively you rotate your core and hips, then transfer that energy through your shoulder, forearm, and wrist. To engage them, start in a side-on stance, feet wider than shoulder-width, knees slightly bent. Load your rear hip by shifting your weight onto your back leg while keeping your torso tall.
Explosively rotate your hips toward the net, then let your trunk follow so the racket lags slightly behind. Keep your abs braced so rotation doesn’t leak energy. Time the hip turn just before your hitting arm accelerates.
| Focus Cue | Purpose |
|---|---|
| Side-on stance | Maximizes rotational range |
| Weight on back leg | Preloads hip drive |
| Braced core | Directs force upward |
| Sharp hip turn | Increases shuttle speed |
Coordinate Shoulder Rotation
With your hips and core driving the motion, your shoulder becomes the key link that channels that rotation into the racket head. To coordinate it, you’ve got to time shoulder rotation so it neither leads nor lags behind your torso.


- Turn your non-racket shoulder slightly toward the net as you prepare, keeping the racket shoulder relaxed and behind you.
- As your core unwinds, let the racket-side shoulder rotate forward smoothly, not jerkily, staying in line with your trunk.
- Maintain a stable scapula (shoulder blade set down and back) so force transfers efficiently instead of leaking into loose joints.
- Finish with your racket shoulder pointing toward the shuttle’s flight path, confirming full rotation and clean energy transfer through impact.
Maximize Wrist Snap
Channel your body’s rotation into a sharp wrist snap so the racket head accelerates fastest right before impact. Keep your grip relaxed until the final fraction of a second, then tighten your fingers as you snap. Your wrist should start neutral, then extend and pronate together, like cracking a whip.
Position your forearm roughly in line with the shuttle’s path. As your shoulder and elbow drive forward, delay the wrist until the shuttle drops into your ideal contact zone. Then, snap forward and slightly down, leading with the racket head.
Drill this by performing half‑smashes: reduced arm swing, full body rotation, exaggerated wrist snap. Focus on a crisp contact sound and steep trajectory, not brute force.
Fix Your Badminton Grip for Effortless Power
One of the fastest ways to release a heavier smash is to correct your grip so the racket can accelerate freely and strike cleanly through the shuttle. Use a relaxed, neutral “forehand” grip: hold the handle like a handshake, with a small gap between your fingers and palm, and the bevel forming a V between thumb and index finger. Mastering this relaxed forehand grip builds a foundation for grip versatility so you can adapt quickly to different shots.
Key grip checks:
- Hold near the end cap so the racket’s length and leverage work for you, not against you.
- Keep your index finger slightly separated as the main steering and power finger.
- Place the thumb lightly on the side bevel, not flat on the wider face.
- Maintain only enough tension to control the racket; tighten briefly at impact for a crisp, efficient transfer of force.
Relax Your Arm and Let the Racket Whip
Once your grip’s working for you, the next priority is freeing your arm so the racket can whip through the shuttle instead of you muscling the stroke. Keep your shoulder, elbow, and wrist loose as the shuttle travels, then sequence tension only at impact. From your preparation, let the racket head “lag” behind your forearm. Lead with your elbow, then rotate your forearm (pronation) and snap your wrist just before contact. Think of cracking a whip: relaxed build‑up, sharp acceleration, immediate relaxation. Don’t lock your shoulder or swing from the biceps. Use shoulder rotation and core turn to start the motion, but let the forearm and wrist create the final speed. With this relaxed whipping action, a lightweight racket and appropriate balance can further boost swing speed while reducing fatigue over long sessions. Practice slow, exaggerated whippy swings, then add speed while staying relaxed.
Time Contact for a Steeper, Faster Smash
Although raw power matters, your smash only becomes truly dangerous when you contact the shuttle at the ideal height and timing for angle and pace. You’re aiming to strike it slightly in front of your body, at the highest reachable point, with your racket already accelerating.
To build this:
- Watch the shuttle early, tracking its peak so you can move beforeit starts dropping.
- Use quick adjustment steps under the shuttle, so your hitting shoulder is behind it at contact.
- Start your swing just before the shuttle reaches striking height; don’t wait until it’s beside you.
- Sync your pronation with the exact contact moment, so racket speed peaks onimpact, not before.
Drill this slowly, then increase pace while keeping the same contact pattern. For an even more penetrating smash, especially if you use a head-heavy racket, make sure your racket balance and shaft stiffness match your strength so you can generate power without overswinging.
Place Your Smashes to Maximize Impact
Even with a powerful swing, your smash only wins points consistently when it’s aimed to exploit space, movement, and weak defensive positions. You’re not just hitting hard; you’re targeting where your opponent can’t defend on time. Prioritize accuracy and tactical intent over raw power. Choosing a racket with the right weight distribution for your style can also help you control smash angles and placement more precisely.
Use these core placement patterns:
| Situation | High‑percentage smash target |
|---|---|
| Opponent deep backhand corner | Steep smash to backhand hip or inside shoulder |
| Opponent recovering from front court | Fast smash to open rear corner, away from movement |
| Opponent centered, racquet high | Smash at the racquet hip to jam and limit swing |
| Opponent flat-footed mid‑court | Smash just beyond service line, into non‑racket side |
Always decide your target before you jump or plant, then commit fully.
Simple Drills for a Stronger Badminton Smash
To build a stronger smash efficiently, you’ll use three targeted drills: shadow swings for timing, wall hitting for contact consistency, and multi-shuttle sequences for power under pressure. You’ll perform shadow swings to engrain correct racket path, contact point, and body rotation without shuttle distraction. Then you’ll use wall hitting and multi-shuttle power practice to repeat high-quality impacts at speed, reinforcing both accuracy and force. Pairing these drills with a high-quality racket featuring head-heavy balance and a larger sweet spot can further amplify your smash power without extra effort.
Shadow Swings For Timing
When you remove the shuttle and practice only the motion, shadow swings let you isolate smash timing without the distraction of contact. Stand in your rear-court position, split-step, rotate your shoulders, then swing through an imaginary shuttle at your ideal contact point, slightly in front and above your head. Focus on sequencing: legs, hips, torso, shoulder, arm, then forearm pronation.
Use these checkpoints:
- Sync your split-step with an imagined opponent hit, then explode into your hitting stance.
- Pause briefly at the loaded position, then accelerate only through the “contact” zone.
- Freeze your finish and check racket face direction and body balance.
- Repeat 10–15 shadow smashes per set, increasing tempo only when mechanics feel identical each rep.
Wall Hitting Consistency Drill
One of the most efficient ways to build a reliable smash is a simple wall hitting drill that forces you to repeat clean contact under tight timing. Stand 3–4 meters from a solid wall and mark a “net” line at roughly net height. Use a feather or plastic shuttle and your normal smash grip and stance.
Start by tossing the shuttle to yourself and smashing it into the wall so it rebounds above your “net” line. After each hit, recover your racket to the ready position and adjust your feet, then strike again before the shuttle drops too low.
Aim for sequences of 20–30 clean contacts. Prioritize a relaxed shoulder, fast forearm pronation, and consistent contact in front of your body.
Multi-Shuttle Power Practice
Step up your smash development with simple multi-shuttle drills that overload your power mechanics and footwork at the same time. Use a feeder with 10–15 shuttles. Stand in your rear court, split-step on the throw, then attack each shuttle with full smash mechanics but at 80–90% power, focusing on timing and body rotation.
- Rapid-fire baseline smashes: feeder alternates rear corners; you recover to center after every hit.
- Three-smash sequence: straight, cross, straight, then rush the net as if following in.
- Smash–stick–smash: hard smash, quick stick smash, then another full smash to reset technique under fatigue.
- Target zones: place markers in rear court; feeder lifts there and you drive smashes directly to each marker.

